

Aug 19, 2022
conventions drama llamas the tillvayle-committee psychic night-school
It’s the last month of summer, and the season is dragging itself out in heavy, humid days with nights of restless sleep. I’m not going to lie: I’m exhausted and can’t wait to feel cold again. It occurs to me, though, that with this newsletter I’ve been writing to you all for 7 months now, despite travel and time commitments. I’m proud of that, and that pride spurs me on to get this letter to you. I hope that you’ve enjoyed reading and will continue to do so!
Conventions continue
This weekend I’ll be at Tabletop Scotland, just as a visitor and player. It’ll be my first time and I’ve heard good things about the friendliness of this con. I’ll be sure to report back next newsletter!
In the meantime I’m getting close with my preparations for Tabletop Gaming Live in Manchester this September - my first convention as a vendor! It’s been such a joyful process getting my games into print that I can almost convince myself that it doesn’t matter if I don’t sell any. Almost. If you’re coming down give me a shout! I’d love to say “hey” to some new faces.

Release Updates
Play testing for Drama Llamas, my new game about llamas who are also reality TV show contestants, is heading into its second round of play testing. The first was an absolute blast and I can’t wait to get another gang together to try the new and improved mechanics. I’m so excited to show you all what I’ve built and hoping to get this done before the end of the autumn (or fall, if you’re so inclined). Watch this space for previews!
Review - Into the Odd

I picked up Into the Odd without much idea of what to expect. Previously unfamiliar with Bastionland and writer Chris McDowall’s work, I’m only semi-ashamed to say that I initially coveted the book as a gorgeous objet d’art, and my spend-happy convention brain did the rest.
I suppose the one thing I did expect, from the first page or so, was a lot of setting detail, and that is what I got after a fashion. The basics are imparted across a couple of pages. The Odd and its only city of note, Bastion, form an ugly, beautiful, industrial, and archaic land where treasure hunters and cults vie for precious arcana; items of murky origin with strange, sometimes deadly, powers. The rest is imparted via art, a long list of potential arcana, and the contents of many excellent random rolling tables in the “Oddpendium” (my favourite being one titled “I Eat the Stuff”). Aiming to inspire and prompt adventure rather than dictate, this work seems designed to encourage low-to zero-prep game sessions and will no doubt be treasured by GMs who favour that style.
The latter half is largely taken up with a gorgeously detailed hex-crawl campaign guide. Again, there’s no forced plot line here. Just many potential permutations of locations and situations to discover, stimulating the best kind of chaos at your table.
August Freebie - Zulavod's Lair
Designing a fun dungeon is a nuanced challenge. Personally I don’t have the stamina for a mega-dungeon and my players tend to prefer a story-driven campaign which is not impossible but hard to generate in a restricted locale. It’s still nice to play in a smaller sandbox sometimes though, and I recently really enjoyed constructing and running my interpretation of a classic dragon’s lair. It’s written for D&D 5E but should be pretty easy to adapt to other suitable systems. Difficulty-wise I’ll just say it posed quite a challenge for my level 6 party of 5 quite experienced players.
To my players: stop reading now if you don’t want spoilers! This write up will include rooms and backstory for the dungeon which you have yet to uncover.
Content warnings: crushing traps, and veiled references to people trafficking occurring over 100 years before the narrative.
The main antagonist, Zulavod, is a young red dragon, around 150 years old. His lair is accessible via a canyon carved by a flowing lava river, and was originally built by fire giants to be the home of Queen Authyld and her war band.
Just over 150 years ago the ancient red dragon Zularoyl, stormed Authyld’s fortress and slew all within, securing it as a nest for her soon-to-be-hatched wyrmling, Zulavod. Dragons do not make the best parents, and Zularoyl lived here with her son for just one unhappy decade before leaving him to fend for himself, taking most of the giant queen’s hoard with her. Zulavod has been alone since, growing in power but making slow progress at amassing his own wealth.
The keyed map below links to a larger, VTT-sized copy for you to use. More dungeon notes below.
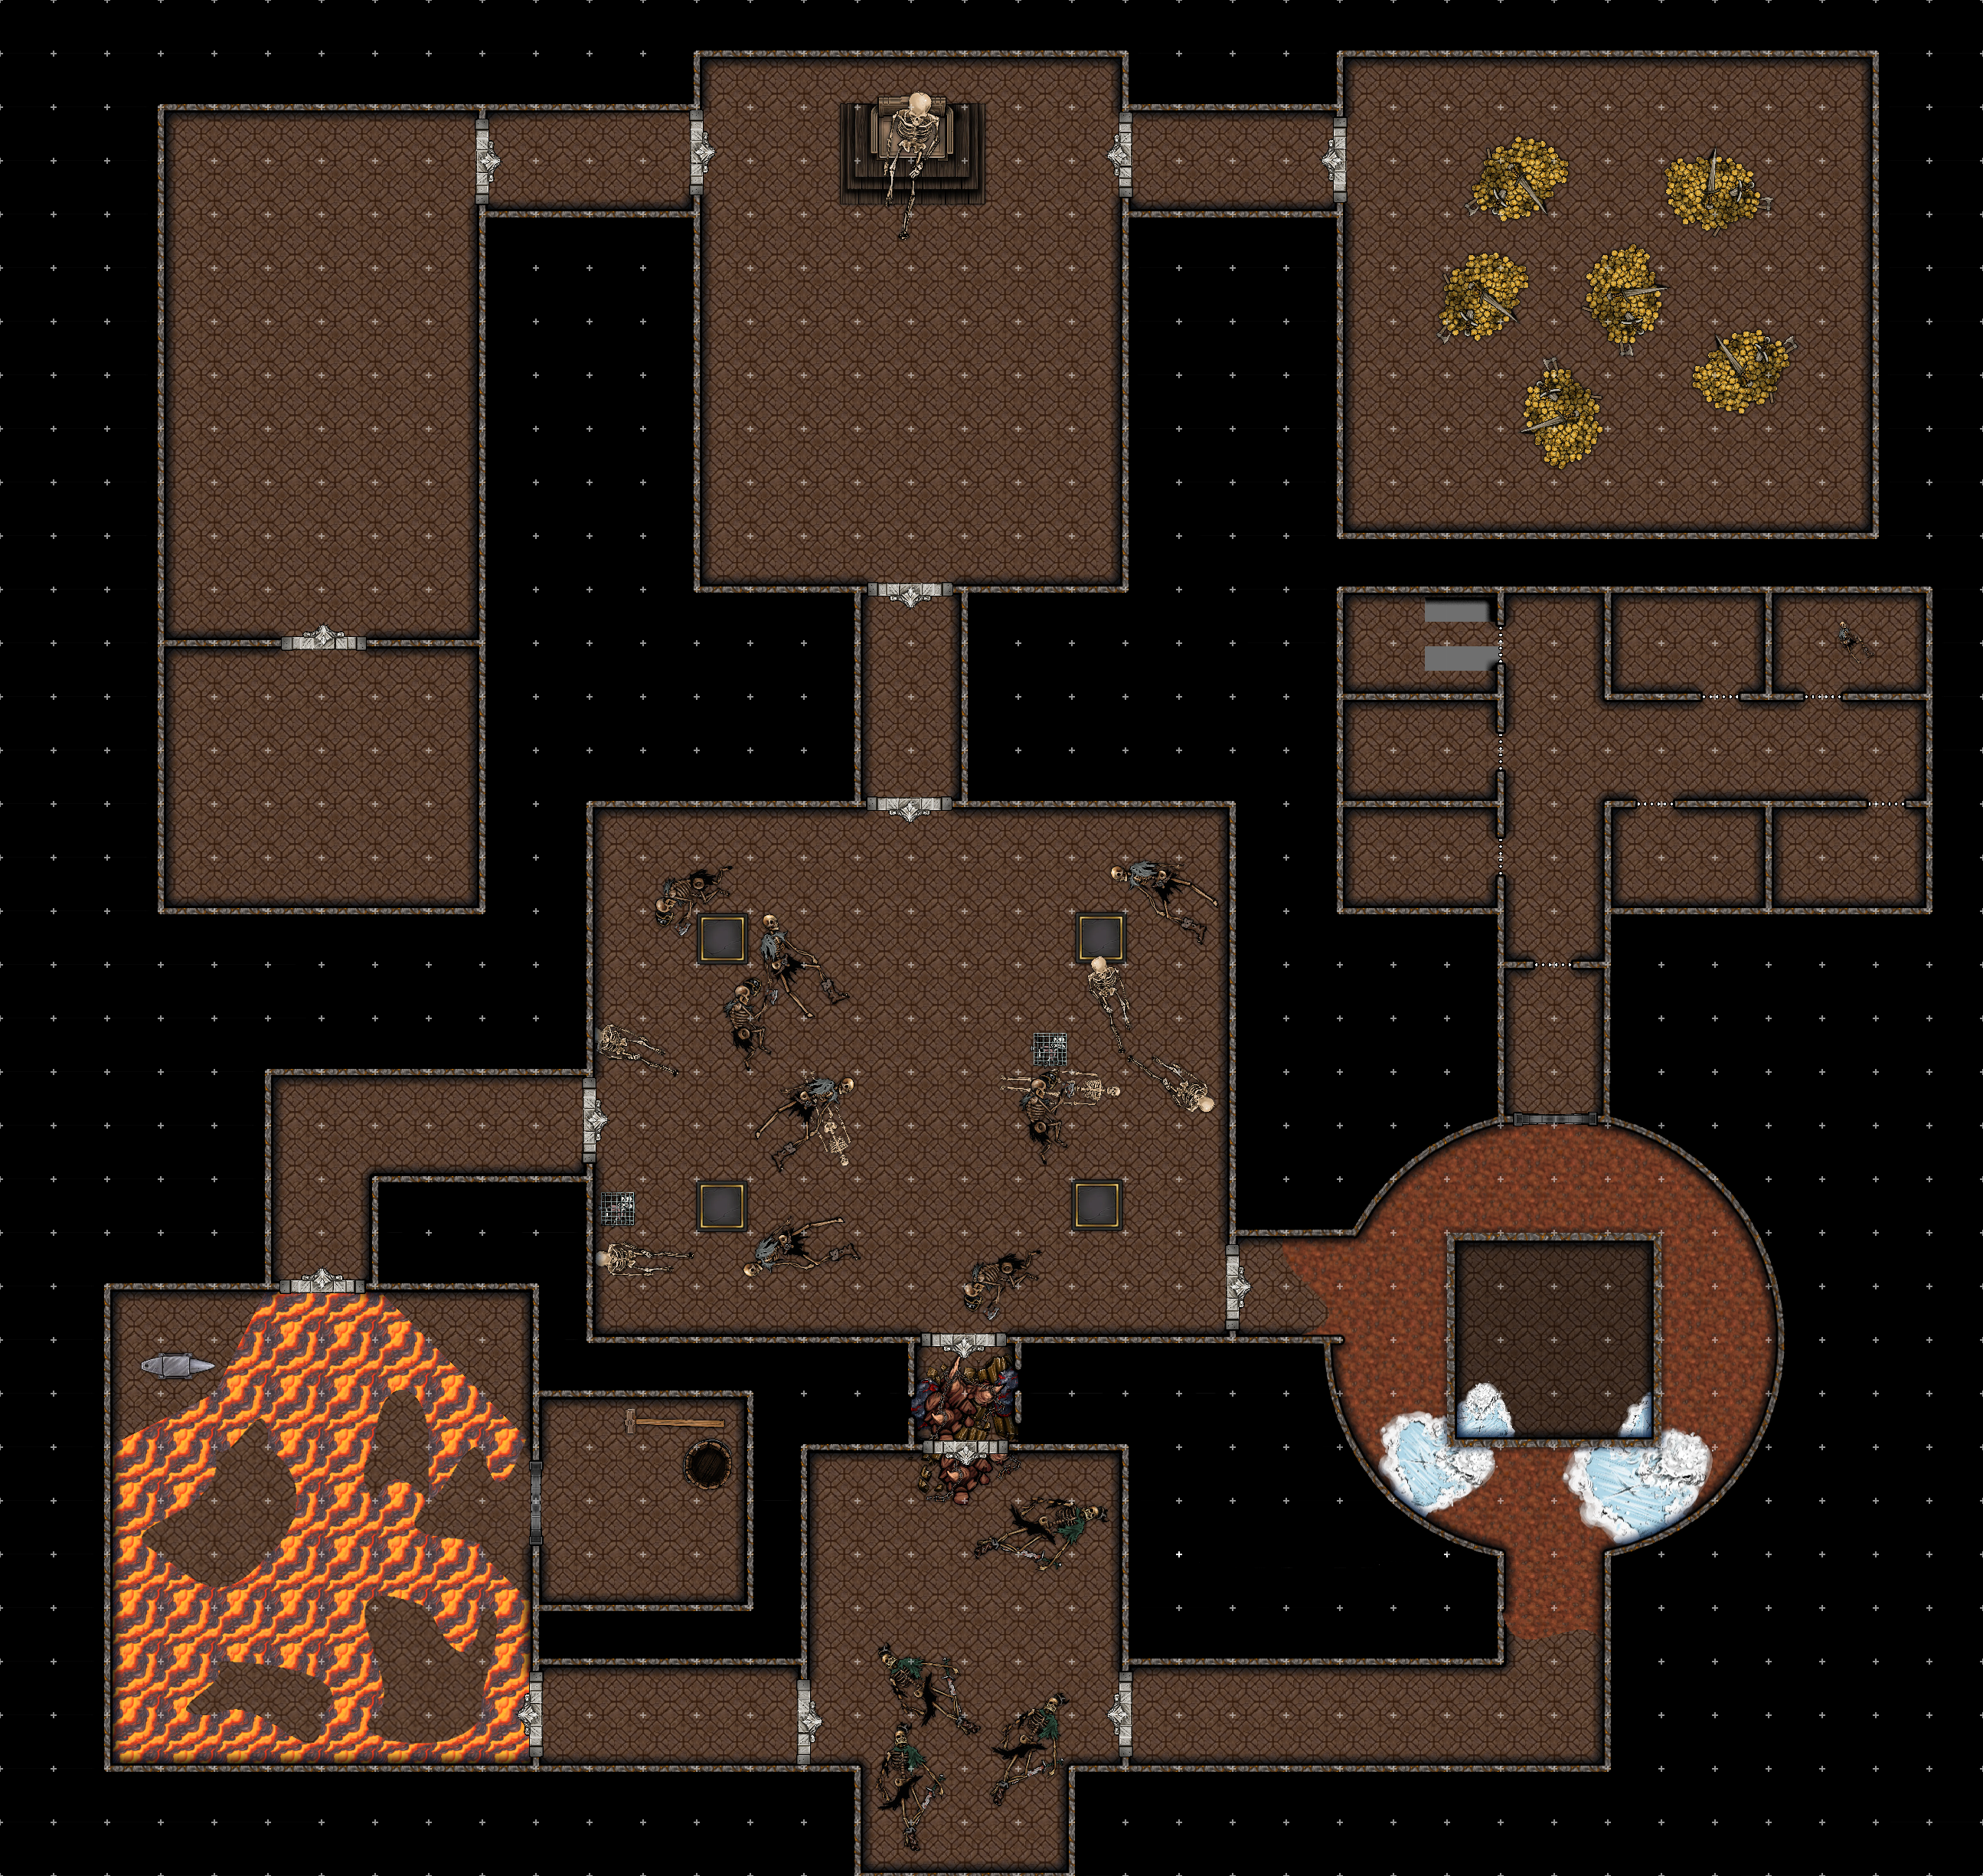
General Notes
- The walls and floors are stone, but decorated in all nooks and crannies with elaborate brass metalwork
- Ceilings are 30ft high, doorframes 25ft, except where stated otherwise
- The air is stiflingly hot and dry
- Everywhere there are small pits in the walls and ceilings where affixed gemstones have been removed, taken by Zularoyl for her hoard
- The dragon spends a lot of its time sleeping in the Treasury (Area 10). He will wake if the party make a lot of noise, eg. by springing traps
Entering the Lair
The front doors are 25 foot tall, made of 2 foot thick stone and carved with huge, flaming crowns.
- They open inwards to the Entrance Hall (Area 1), requiring a DC 30 Strength check to push (add up the party’s rolls if they all join in)
-
The main doorway’s siege protection mechanisms are primed and ready to spring when anyone opens the door.
- If the doors are opened, any creatures standing in front of them hear a faint metallic creaking sound just in time to make a Dexterity Save (DC 14) as a pair of giant, dragon-faced, flaming battering rams swing towards them on massive chains
- On a failed save creatures in front of the door take 3d10 bludgeoning damage, plus 2d6 fire damage.
There’s also a secret stairway to the left hand side of the front door, leading up over the heavily carved and decorated doorframe to a small tunnel.
- A DC 17 Perception check will allow characters to notice the stairs
- The passage is 5x5 feet and appears to have been melted through rock.
- It travels north 25 feet then west 35 coming out 20 feet up on the wall above the Sunken Forge (Area 2)
- Half way through the passage passes 30ft up over the entrance hall, where a hole in its walls would allow a small or medium character to jump through
Area 1 - Entrance Hall
- Crowded with 10 scorched giant skeletons, all 20ft tall and wearing rusted and melted metal armour
- One of these corpses has a pack containing Iron Bands of Bilarro
- The hallway leading north to the Marketplace (Area 6) is collapsed, requiring 1 hour to clear, divided by the number of hands helping (so 20 minutes if three characters work together)
- Two other hallways leading east and west are clear.
Area 2 - Sunken Forge
- Sunken anvils, a floor partially reclaimed by lava
- 6 magma mephits are dancing between lava pools. Group Stealth check, DC 10+ on average to avoid being noticed by them
- The mephits pose little threat to the party, but can be bargained with for information. They know about the dragon in the treasure room, and the brown mold in Area 4
- If the characters spend more than 5 minutes in close proximity to the lava they should roll a DC 10 Constitution save to avoid taking a point of exhaustion
Area 3 - Storage Room
- Contains a stock of fire giant-sized metal buckets, tongs, hammers
- DC 15 Strength check to lift or move any of them
Area 4 - Fighting Pits
- In contrast to the rest of the dungeon, it’s cold in here, and the floor around the pit is brown and furry, except where cracks in the walls have leaked water onto the floor which has formed ice crystals
- There’s a locked door to the north, a passageway to the west, and a pit in the centre
- The pit is 30 feet deep, and a large brass key hangs from a ten foot chain attached to he ceiling above it - fully 50 feet from the bottom of the pit. This is a skeleton key to all the locked cells in Area 5
-
The pits are covered in patches of Brown Mold, which feeds on warmth
- When a creature moves to within 5 feet of the mold for the first time it feels the chill of the air nearby
- The first time a creature touches the mold or starts its turn in contact with it, it must make a DC 12 Constitution saving throw, taking 16 (3d10) cold damage on a failed save, or half as much damage on a successful one
Area 5 - Cells
- Mostly locked and containing the skeletal remains of various humanoid creatures
- In one cell lies the skeleton of a human wizard, still locked in a set of Dimensional Shackles
Area 6 - Marketplace
- More scorched giant skeletons, these without armour
- There are about 20 of them in this massive, cavernous room, some collapsed on top of each other
Area 7 - Throneroom
The throneroom is surrounded by trapped hallways
- The hallways between the Marketplace (Area 6) and the Throne Room, and between the Throne Room and the Treasury (Area 10) are trapped
- The traps are triggered by pressure plates, which can be spotted with a DC 13 Perception or Investigation check. The plates are visible as 3, slightly less-worn floor tiles
- Once triggered, portcullises slam shut either side of the hallway and the walls begin to move inwards, taking 2 rounds for the mechanism to begin crushing trapped characters
- Crushed characters take 5d10 bludgeoning damage per round
- Crushing walls can be stopped by wedging a magic item between them, by holding them back with a successful DC 18 Strength check per round, or by breaking the chain mechanism which can be seen overhead with a DC 14 Perception check. The mechanism has AC 17, HP 18
In the throneroom itself:
- The scorched skeleton of the fire giant Queen Authyld still sits on her ornate brass throne, a crown resting jauntily on her grinning skull
- Her thumb hovers over a hidden switch integrated into her patterned arm rest, requiring DC 15 Perception or Investigation check to spot. This opens a secret passageway behind the throne
-
If any creature or magic touches Authyld’s crown it emits a wave of force damage with a 40ft radius centred on the crown
- Every creature in range must make a DC 14 Dexterity save
- On a failed save creatures are knocked prone and take 2d8 force damage. Successful-savers take half the damage and stay upright
There's a secret passageway behind the throne.
- DC 17 Perception check to find the secret passageway while inspecting the walls. The stone floor is scuffed near the entrance and there’s a slight lip. Or the passage can can be discovered and opened using the hidden switch on Authyld’s throne
- The 5x15ft passageway leads north 10 feet, then slopes upwards and east 64 ft, then south 10 feet to a point high up behind the Treasury wall (Area 10).
- Mid way through the passageway lies the queen’s champion, in once-ornate armour now rusted and useless. In his hands he holds a pristine Giant Slayer Axe
- Holes in the mortar between stones at the end of the passage can be used to spy on the area below. The stones are loose and can be removed. The dragon doesn’t know about the passage
- DC 18 Stealth check to avoid being heard by Zulavod while removing the bricks, DC reduced to 14 if he’s still asleep
Area 8 & 9 - Authyld's Chambers
- Once-fine living quarters including an entertaining salon and a smaller boudoire
- Both have been ransacked, slashed with claws and scorched with fire
- The furniture was once all of beautifully forged, shining brass. It’s been melted and bent in various places, sometimes into a shiny puddle
Area 10 - Treasury
- Unless the party woke him by making noise, the dragon is sleeping surrounded by 6 surprisingly small treasure piles in this huge vault. DC 14 Stealth check to avoid waking him.
-
Loot:
- 6 piles of mixed coins making around 3000gp per pile (roughly 2500gp, 4000sp, 10000cp)
- 100gp worth of gemstones in each pile
- 1 set of mithral armour (a chain shirt)
-
Other items for high (15+ Perception) rollers, or those who take a lot of time to search:
- Cloth of gold vestments (worth 25gp)
- Gold ring set with bloodstones (worth 250gp)
- Gold birdcage with electrum filigree (worth 250gp)
- Silver chalice set with moonstones (worth 750gp)
-
Ways out:
- Back the way they came in
- There’s a tunnel of melted rock 10x10 feet, 25 feet up in the treasure room wall. It leads out onto the side of the canyon.
